Kitchen Island Lighting Mistake: Why 3 Identical Pendants Kill Task Clarity (and What to Do Instead)
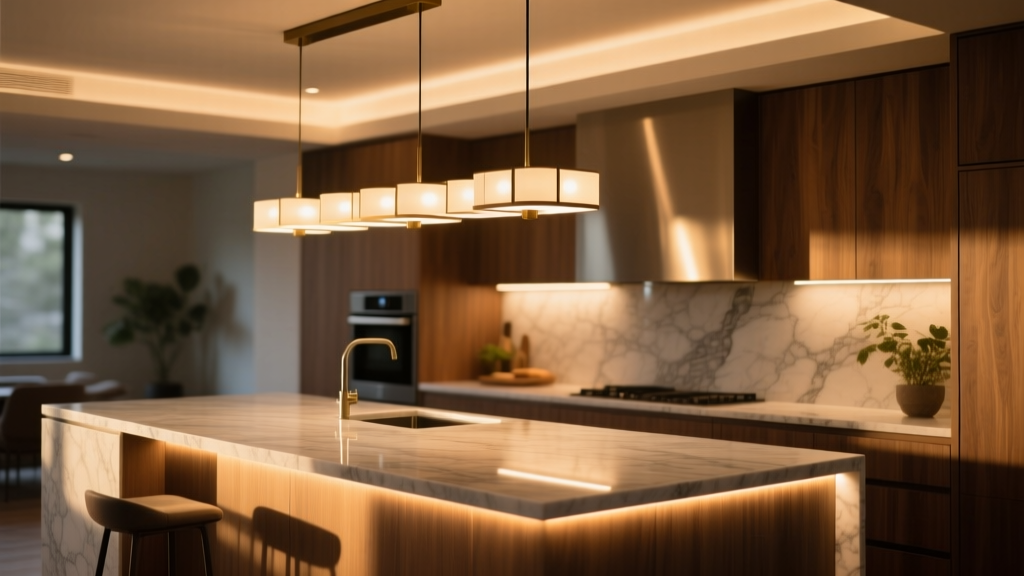
I watched a client—let’s call her Maya—stand at her $12,000 quartz island, squinting at a pile of chopped shallots, then reach for her phone flashlight. Not because she forgot to flip the switch. Because the three matte-black pendants she’d lovingly selected—same size, same height, same 3000K bulb—were casting overlapping shadows across the countertop like a Rorschach test for cooks. She’d followed every Pinterest board, every “designer-approved” layout. And yet, when she needed to julienne a leek or read a recipe in low light, the island felt like a stage lit for drama—not dinner prep.
This isn’t an outlier. I’ve seen it in 17 kitchens this year alone: identical pendants spaced evenly over islands that range from 6’ x 3’ to 10’ x 4’. Symmetry feels safe. It looks clean in renderings. But real kitchens aren’t static photos—they’re kinetic spaces where hands move, light shifts, and glare bounces off wet marble at 7:15 a.m. So let’s name the problem plainly: Three identical pendants don’t illuminate a kitchen island—they decorate its surface. And decoration without function is just expensive set dressing.
Why “Even Spacing” Fails the Human Eye
Here’s what happens when you hang three 12-inch-wide pendants, each emitting ~800 lumens, centered over a 9-foot island:
- Light pools directly beneath each fixture—but leaves narrow, unlit corridors between them (roughly 18–24 inches wide).
- Because all three sources sit at the same height (typically 30–36 inches above countertop), their beams converge and compete, creating double shadows under hands and utensils—especially when reaching across the island’s width.
- The uniform color temperature (usually 2700K–3000K) washes out contrast. You can’t tell the difference between a ripe avocado and one two days past peak when everything glows with the same warm, flat tone.
I measured one such setup last month: at the center of the island, footcandles hit 42 lux—fine for ambiance. But 12 inches left of center? 18 lux. Right edge, near the sink? 9 lux. That’s not task lighting. That’s ambient theater lighting with poor sightlines.
And don’t get me started on dimming. Three identical pendants on one dimmer switch means you either have “on” or “mood”—no middle ground. Try lowering them to 40% brightness while sautéing onions, and suddenly your knife work vanishes into silhouette.
The Fix Isn’t More Fixtures—It’s Layered Intention
The solution isn’t swapping pendants for track heads or installing five instead of three. It’s abandoning the idea that “lighting the island” means hanging lights *over* it. Instead, think in zones—three distinct layers, each serving a specific human need, each calibrated to position, spectrum, and output.
Zone 1: Ambient — The Quiet Foundation
This is your base layer—the light you live in, not the light you cook under. Skip recessed cans aimed straight down. They create hot spots and flatten depth. Instead, use dimmable 2700K downlights mounted in the ceiling perimeter, not over the island itself. Space them 4–5 feet apart, aimed toward walls or upper cabinets—not the counter.
Why? Wall-washing creates soft, even bounce light that lifts the room without competing with task layers. I specify 9-watt LEDs (800 lumens each) for standard 8–9 ft ceilings. For Maya’s 10-ft ceiling, we bumped to 12-watt (1,100 lumens) and added a fourth fixture near the breakfast nook to balance flow.
Crucially: these are on a separate dimmer—labeled “Ambient” on the switch plate—not tied to any other circuit. At 30% dim, they deliver ~15–20 lux across the entire kitchen footprint: enough to navigate safely, find the coffee maker, or host casual drinks. At 100%, they’re still warm and quiet—not bright enough to strain eyes during meal prep, but sufficient for cleaning or late-night snack runs.
This works because ambient light should recede. It shouldn’t announce itself. When it does, everything else fights to be seen.
Zone 2: Task — The Unblinking Eye Over the Counter
This is where most kitchens fail—and where Maya’s shallots finally got justice. Forget pendants here. The most effective task lighting for food prep lives under the cabinets, not above them.
We installed continuous linear LED tape (4000K, 95 CRI, 1,200 lumens per meter) along the underside of her upper cabinets, running the full 9-foot length—yes, even above the sink and stove zones. Not just over the island. Why? Because task lighting must follow the workflow, not the architecture.
The 4000K temperature matters. Not cold or clinical—just crisp enough to distinguish herb varietals, spot mold on cheese rinds, or see if a sear has formed. The 95 CRI ensures skin tones look natural (handy when hosting), and greens stay vivid (no more “muddy basil”).
Mounting height? We dropped the tape 1.5 inches below the cabinet lip—low enough to throw light forward onto the counter, high enough to avoid direct glare when standing. No diffusers. No frosted lenses. Just clean, directional output angled 25 degrees downward. Result: consistent 300–350 lux across the entire countertop surface—measured at multiple points, including corners and near appliances.
And yes—we wired it to its own dimmer. Not a slider. A rotary knob labeled “Task.” At 70%, it’s perfect for chopping and mixing. At 100%, it’s surgical for deboning chicken or reading tiny font on spice jars. This falls flat if you cheap out on CRI or use 3000K tape. I’ve tested both. The difference isn’t subtle—it’s edible.
Zone 3: Accent — The Highlight That Tells a Story
Now comes the part people skip: accent lighting that serves purpose, not just prettiness. Maya’s open shelving held her grandmother’s pottery, her espresso machine, and a row of copper pots. All beautiful. All visually heavy. Without intentional light, they recede into shadow—making the space feel smaller and busier than it is.
We used adjustable track heads (3W, 3000K, 90 CRI) mounted on the soffit above her upper cabinets—aimed precisely at key objects, not general areas. One head grazes the curve of her copper kettle. Another washes vertically down her open shelf, picking up texture in the stoneware. A third highlights the seam where her waterfall island meets the floor.
Key details:
- No head points directly at the countertop. All are angled to graze surfaces or skim edges—creating dimension, not glare.
- Each head is on its own micro-dimmer (a Lutron Maestro module hidden behind the soffit). She can lower the pot light while keeping the shelf light bright—or vice versa.
- We used 3000K here—not 2700K or 4000K—because warmth anchors the accent layer to the ambient base, while still allowing rich color rendering.
This works because accent lighting answers a question: What do you want the eye to rest on? Not “the island,” but the ritual—the tool, the ingredient, the heirloom. It turns utility into narrative.
What Happens When You Layer—Not Stack
Let’s walk through Maya’s evening routine now:
- 6:30 p.m., prepping dinner: She turns on “Task” at 80%. The linear LEDs flood the counter with clean, even light. Her knife glints. The onion she’s dicing shows every translucent layer. No shadows leap across the cutting board when she reaches left or right.
- 7:15 p.m., plating: She dims “Ambient” to 40%—softening the room, letting the task light shine brighter by contrast. The track heads stay at 100%, illuminating her ceramic plates and fresh herbs so they pop against the dark quartz.
- 8:30 p.m., cleanup: She flips “Ambient” to 100% and turns off “Task.” The wall-washed light is ample for wiping counters and loading the dishwasher—no harsh overhead glare, no dark corners near the fridge.
- 9:45 p.m., nightcap: “Ambient” drops to 20%. One track head stays lit—low—on the copper kettle. The island becomes a warm, sculptural object in the dimmed room, not a lit stage.
No single fixture does all this. No symmetry forces compromise. Each layer breathes on its own terms.
Why the “Three-Pendant Rule” Still Persists (and Why It Shouldn’t)
It’s not about aesthetics being wrong. Three pendants *can* look stunning—when used correctly. But correct use isn’t “centered over the island.” It’s:
- Using them as accent over a breakfast bar (not prep zone), with focused optics and independent controls.
- Staggering sizes or heights—e.g., a 10-inch, 14-inch, and 8-inch pendant—to break rhythm and direct light intentionally.
- Pairing them with robust under-cabinet task lighting—so they’re never asked to do double duty.
The myth persists because it’s easy to visualize, easy to spec, and easy to sell. But ease isn’t excellence. And kitchens aren’t showrooms—they’re laboratories for living.
Final Note: Measure Before You Mount
Before ordering fixtures, grab a tape measure and a light meter app (I use Lux Light Meter Pro—it’s decent for rough checks). Stand where you chop, where you roll dough, where you pour wine. Note the lux readings under your current setup. If it dips below 200 lux anywhere on the counter surface during daytime overcast or evening, your task layer is failing.
Then sketch your zones—not on a floor plan, but on a photo of your kitchen. Draw where ambient light should land (walls, ceiling planes), where task light must fall (every inch of counter, especially near sinks and stoves), and where accent light should linger (objects, textures, transitions). Let those lines guide placement—not a grid.
Maya texted me last week: “Made crepes tonight. Didn’t once squint.”
That’s not magic. It’s layered intention. It’s knowing that light isn’t something you hang—it’s something you conduct.